Overview
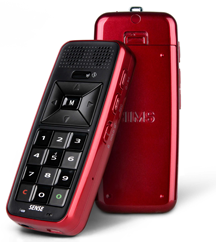
This tutorial teaches you how to transfer a DAISY book to your BookSense.
This tutorial was written using Windows and the BookSense from Aroga Technologies. Some of the steps may vary, depending on your setup.
Step 1: Get a DAISY book
If you don’t have a DAISY book yet, read our tutorial on downloading a DAISY book. The tutorial will walk you through the steps of finding, downloading, saving and unzipping a book in DAISY download (ZIP) format.

Tip: If you use the BookSense Master software, it will unzip and transfer the DAISY book for you.
Step 2: Transfer to BookSense
Note: If you have a computer or USB card reader you may use either instead of connecting your BookSense.
- Find and select the folder with the DAISY book files on your computer.
- Press CONTROL+C to copy the folder.
- Power off your BookSense.
- Connect it to the USB port of your computer using the long USB cable provided, and turn the BookSense back on.
You will hear that the player is connected. - When the BookSense XT or DS is connected to a PC, the Flash disk of the XT or DS appears as a drive labeled ‘BookSense’. If an SD card is inserted in the XT or DS, it appears as a ‘removable disk’. The SD card should be inserted in the BookSense, the standard model, before connecting to a PC.
- Using Windows Explorer or My Computer, find the BookSense SD card in the list of drives. If your CD is drive letter D, then the BookSense SD card will likely be drive letter E. Select the SD card drive and press ENTER to open it.
- ARROW down to the Daisy Books folder on the SD card and press ENTER to open it.
- Now press CONTROL+V to paste your DAISY book folder into the Daisy Books folder. This could take a while as all the files need to be copied.
- When the copy is complete, use the Safely Remove Hardware option of the Windows System Tray to release your SD card.
- Disconnect the BookSense or remove the SD card from your card reader.
The book will now appear in the BookSense Daisy Folder.