Envoy Connect User Guide
Last updated: December 2025
NOTE: This user guide refers to player version T16 or newer. Please refer to the “Hearing Player Version and Serial Number” heading in the “Additional Features” section within this guide to check the version of your player.
This guide refers to both the original Envoy Connect and the Envoy Connect 2. The only difference between the original Envoy Connect and the Envoy Connect 2 is that the Envoy Connect 2 has a USB-C charging port while the original Envoy Connect is charged via Micro-USB. This distinction will be indicated wherever it is applicable.
Table of Contents
- What's in the Box?
- Envoy Connect Diagram
- Player Description
- Definitions of Terms Used in this Guide
- Keypad Button Functions
- Volume Control Button (Upper Left Position)
- Bookshelf Button (Upper Middle Position)
- Sleep Timer Button (Upper Right Position)
- Back Button (Lower Left Position)
- Power and Play Button (Lower Middle Position)
- Forward Button (Lower Right Position)
- LED Indicator (Centre Position, between the button rows)
- Bottom of the Envoy Connect
- Charging
- Managing Books on the Player
- Additional Features
- Advanced: Manual Loading
- Audible Indicators
- Frequently Asked Questions (FAQs) and Troubleshooting
1. What's in the Box?
Included in the box are:
- Envoy Connect Player
- Micro-USB cable (Envoy Connect) or USB-C cable (Envoy Connect 2)
- Headphones
- Lanyard
2. Envoy Connect Diagram
Front face of player

Bottom edge of player
3. Player Description
On the front face of the Envoy Connect player at the top is the speaker. Below that is the keypad with six raised buttons. The keypad has two rows of buttons, described below:
- Upper left: is the long-shaped volume control, which consists of two separate buttons-one upper button, and one lower button. The upper button is volume up, and the lower button is volume down.
- Upper middle: is the round-shaped bookshelf button, marked by four raised dots in a square pattern.
- Upper right: is the circular sleep timer button, marked by one raised dot.
- Lower left: is the back button; it is slightly raised and shaped like an arrow pointing leftwards.
- Lower middle: is the large round power and play button; it is slightly concave.
- Lower right: is the forward button; it is slightly raised and shaped like an arrow pointing rightwards.
Additionally, in the very centre of the front of the device, above the power and play button, there is an LED light.
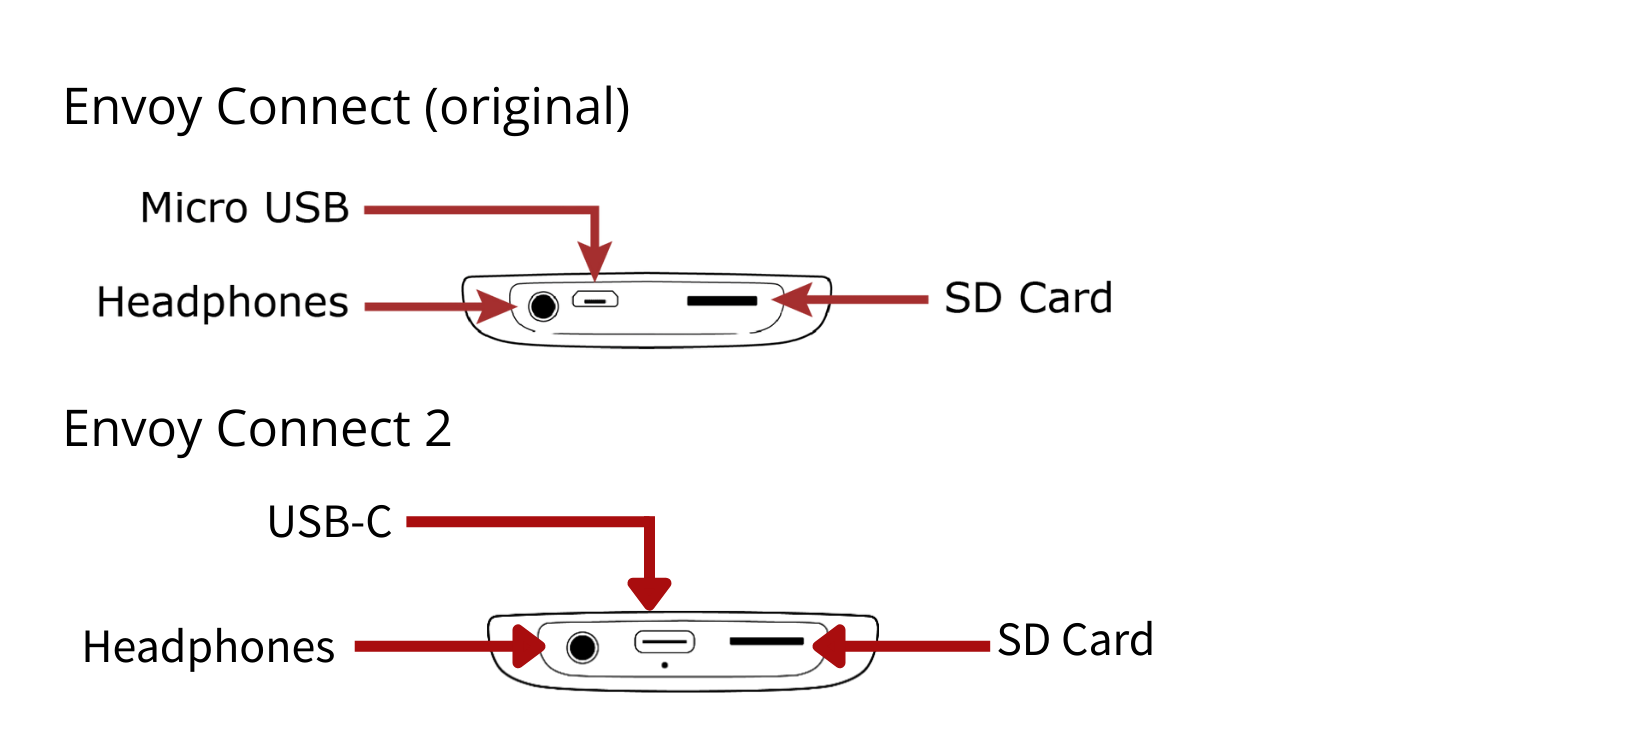
There are three jacks/ports along the bottom edge of the player:
- Left: is the headphone jack.
- Middle: is the Micro-USB port for Envoy Connect or USB-C port for Envoy Connect 2.
- Right: is the Micro SD card slot.
On the back of the player is a rectangular-shaped solar panel. Below that is a printed label. A lanyard can be attached through the centre hole on the back of the player.
4. Definitions of Terms Used in this Guide
Press: means to briefly, but firmly, press the button down and then release it immediately.
Press and hold: means to firmly press the button down and then continue to hold it for a period of time (e.g., press and hold the button for 3 seconds).
5. Keypad Button Functions
Volume Control Button (Upper Left Position)
Press the upper volume button to increase volume incrementally. Press the lower volume button to decrease volume incrementally.
You can also press and hold either the volume up or volume down button to increase or decrease the volume rapidly. A double beep will sound when the maximum or minimum volume is reached. Note that it is not possible to turn the volume off completely.
Note: The player will remember your last volume setting, even if the player is turned off or needs recharging.
Bookshelf Button (Upper Middle Position)
This button cycles through all the books currently on your player. When playback is paused, press once to hear the title of the current book. Press again to hear the next title in your player. You can continue to press the button repeatedly until you reach the last title in your player. Pressing the bookshelf button again at this point will cycle you back to the first book in your bookshelf. Note that you can only go forward while exploring your bookshelf, and not backward. Press Play to begin listening to the chosen book.
Sleep Timer Button (Upper Right Position)
The sleep timer button enables a setting on the device that pauses playback of a book and then turns the player off completely after a pre-selected period of time. Users may choose for playback to be paused and for the device to turn off after 15, 30, or 60 minutes. There is also an option to turn this feature off, which is the default setting. The sleep timer options can only be accessed when playback is paused.
To enable or disable the sleep timer:
- Press once to select a 15-minute sleep timer. A single “knocking” sound will sound to confirm this selection.
- Press again to select 30 minutes. Two knocks will sound to indicate confirmation.
- Press a third time to select 60 minutes. Three knocks will indicate confirmation.
- Press a fourth time to turn sleep timer off. Four knocks at a lower pitch will indicate confirmation.
You may also press and hold the sleep timer button for two seconds at any time except during playback, until you hear four confirmation knocks. This is a shortcut that will cancel the sleep timer.
Back Button (Lower Left Position)
When playing a book:
- Press to skip to previous section or chapter. If you press the back button when playing the first section of a book, it will return to the beginning of the book and resume playback from there.
- Rewind: Press and hold to move backwards through the audio book. Beeps will sound to indicate that you are moving backwards in 30 second intervals.
Note: The back button will only operate during playback.
Power and Play Button (Lower Middle Position)
Power On: To turn the player on, press and hold this button for 3 seconds. Release the button when you hear a single melodic chime. Note that the player will announce the current book title each time it is powered on.
Play/Pause: Press the power and play button to start playback. Press again to pause playback.
Power Off: When playback is paused, press and hold the power and play button for at least five seconds, or until an audible melodic chime is heard, to turn the player off manually. In addition, the player will automatically turn itself off after two minutes when playback is paused and no further action is performed. Note that when you turn the player on again and press play, the player will resume the last reading position of the last book read.
Forward Button (Lower Right Position)
When playing a book:
- Press to skip to next section or chapter. If you press the forward button when playing the last section of a book, a double beep will sound to let you know there is no 'next section', and playback will resume.
- Fast forward: Press and hold to move forward through the audio book. Beeps will sound to indicate that you are moving forward in 30 second intervals.
Note: The forward button only operates during playback.
LED Indicator (Centre Position, between the button rows)
The green light above the play button provides visual information about the player's current operational state. For example, the LED:
- is green when the power is on
- blinks quickly when playback is paused
- blinks slowly to indicate charging via USB cable
- flashes on and off if the battery level is low
- blinks during playback when the sleep timer is on
- blinks when rewinding or fast-forwarding
6. Bottom of the Envoy Connect
Headphone Jack (Bottom Edge, Left corner)
Plug headphones or an external speaker into the bottom left 3.5mm audio jack. This will mute the player's speaker and all audio output from the player will only be heard through the headphones or external speaker until they are removed.
Micro-USB or USB-C Port (Bottom Edge, Middle)
Plug a Micro-USB (for Envoy Connect) or USB-C (for Envoy Connect 2) cable into the bottom middle port. This is used for charging and managing content on the player.
Micro SD Card Slot (Bottom Edge, Right side)
You can add to the 8GB internal memory capacity by inserting a Micro SD card (up to 128GB) into the slot on the bottom right.
Insert the card by gently sliding it into the port, while ensuring that it is inserted so that the ridge on the top face of the card is facing down. The long straight edge of the card will be facing to the right, and the 'jagged' edge facing to the left. Don't use excessive force, it will insert easily when it is the right way around. To eject the card, gently push against it until you feel it pop out from the port. Then, gently slide the card out of the port. Be careful when ejecting the card as it may spring out quickly and be lost. A single melodic chime will be heard when inserting or removing the card.
When using a Micro SD card, the player will sequentially scroll through the content of the internal memory followed by the Micro SD card with each press of the Bookshelf button.
7. Charging
Before Use
When shipped, the Envoy Connect's battery may only be partially charged. Please fully charge the player before the first use.
To do this, use the included USB cable to plug the player into an active USB port on a computer or a USB wall adapter. This type of charger plugs into a power outlet and has a USB slot that you can plug the player into.
Alternatively, you may use a USB wall charger that has the cable built in that you may already own from other devices. Please see below for images and descriptions of suitable chargers.
Suitable USB Wall Chargers
Option 1:
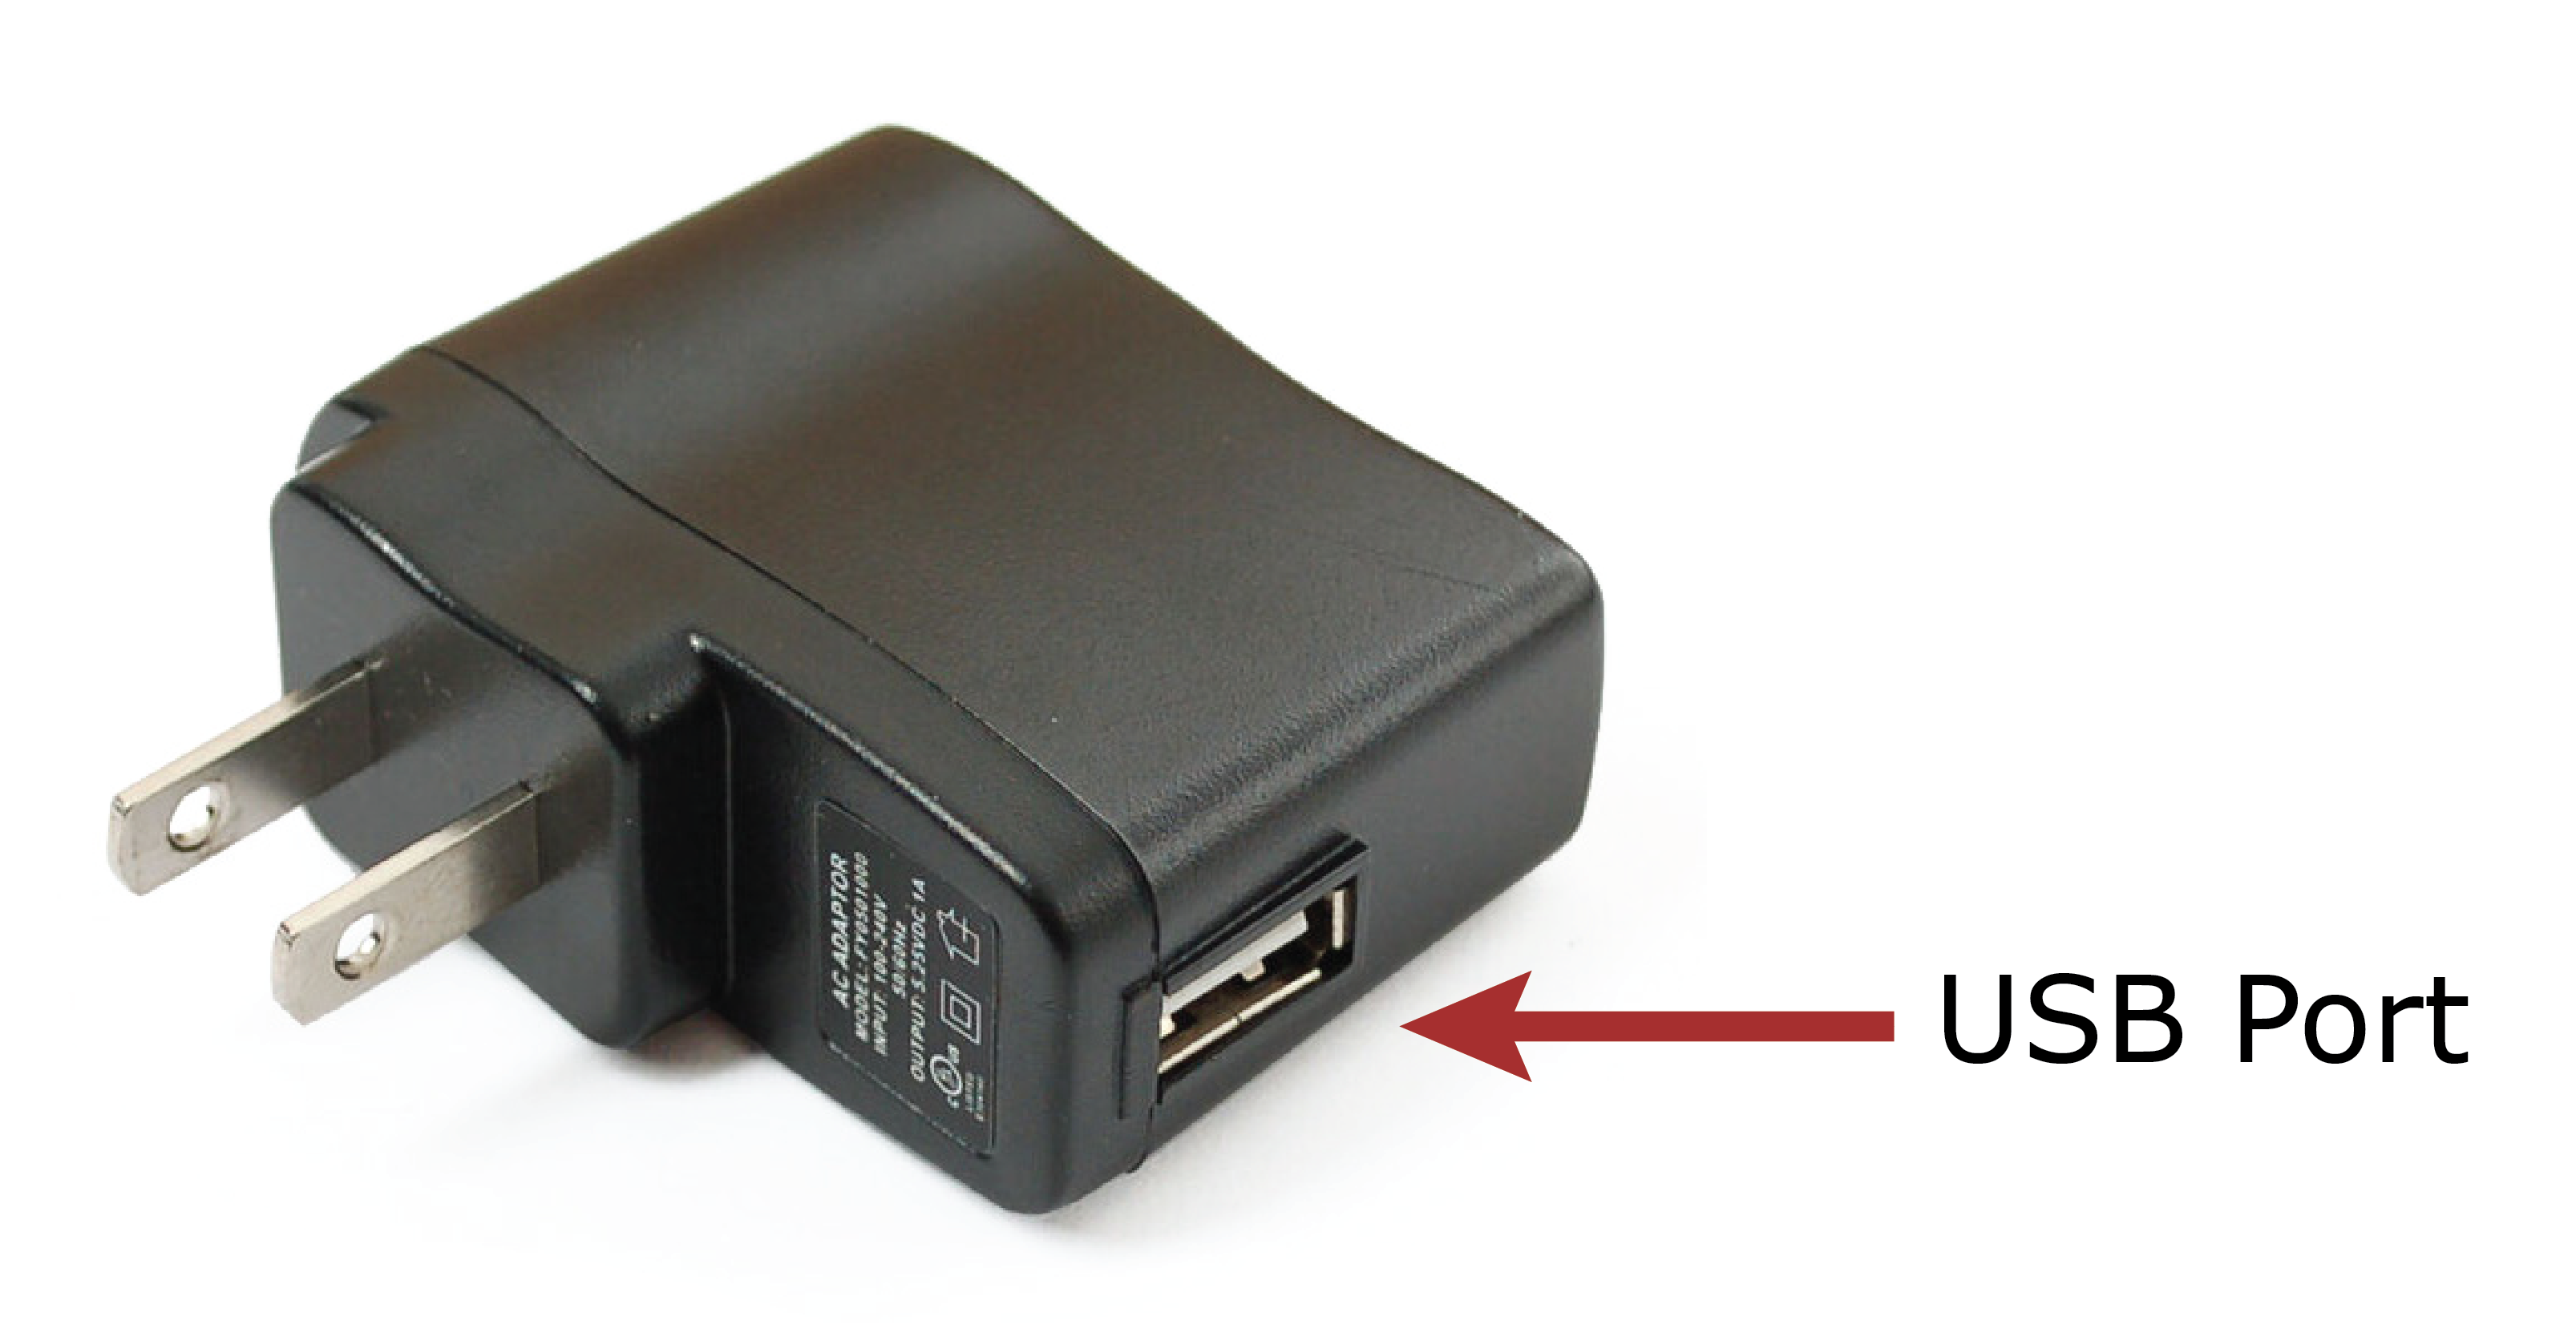
Adapter with USB port (to use with the USB cable supplied with the Envoy Connect).
Option 2 (for Envoy Connect):
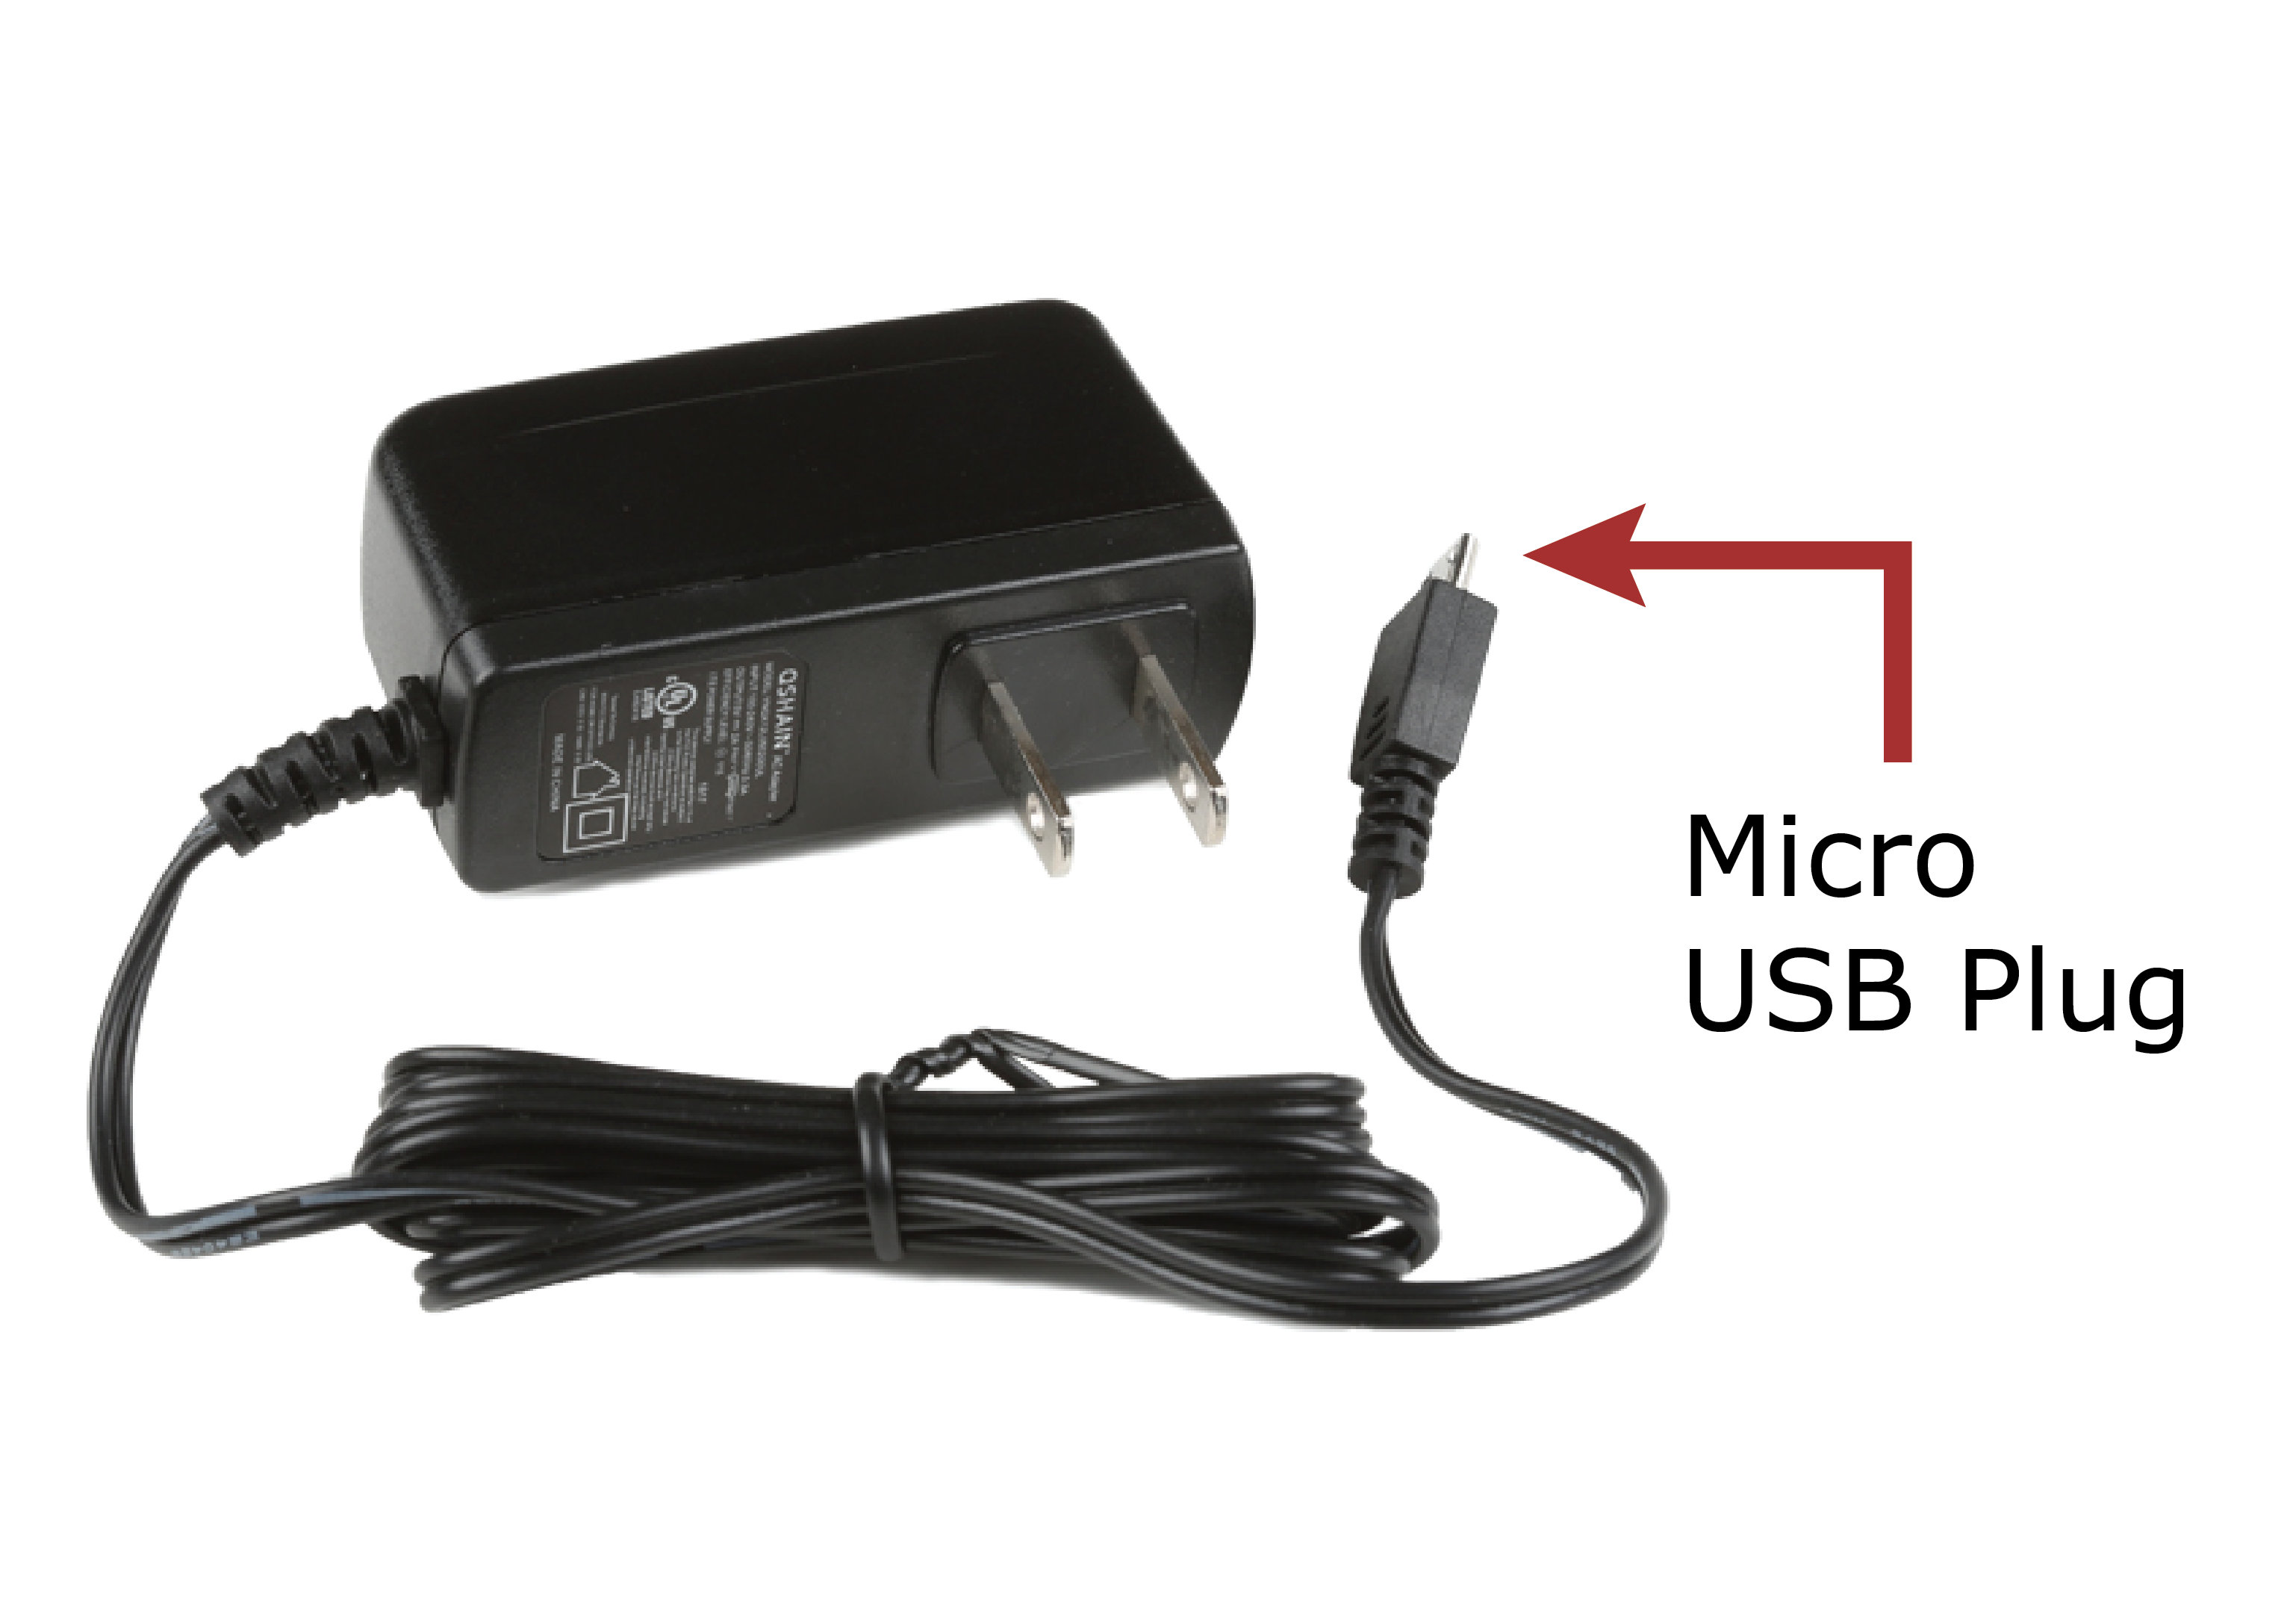
Wall charger with built-in cable and Micro-USB plug. This option will work with the original Envoy Connect that has a Micro-USB charging port.
Option 3 (for Envoy Connect 2):
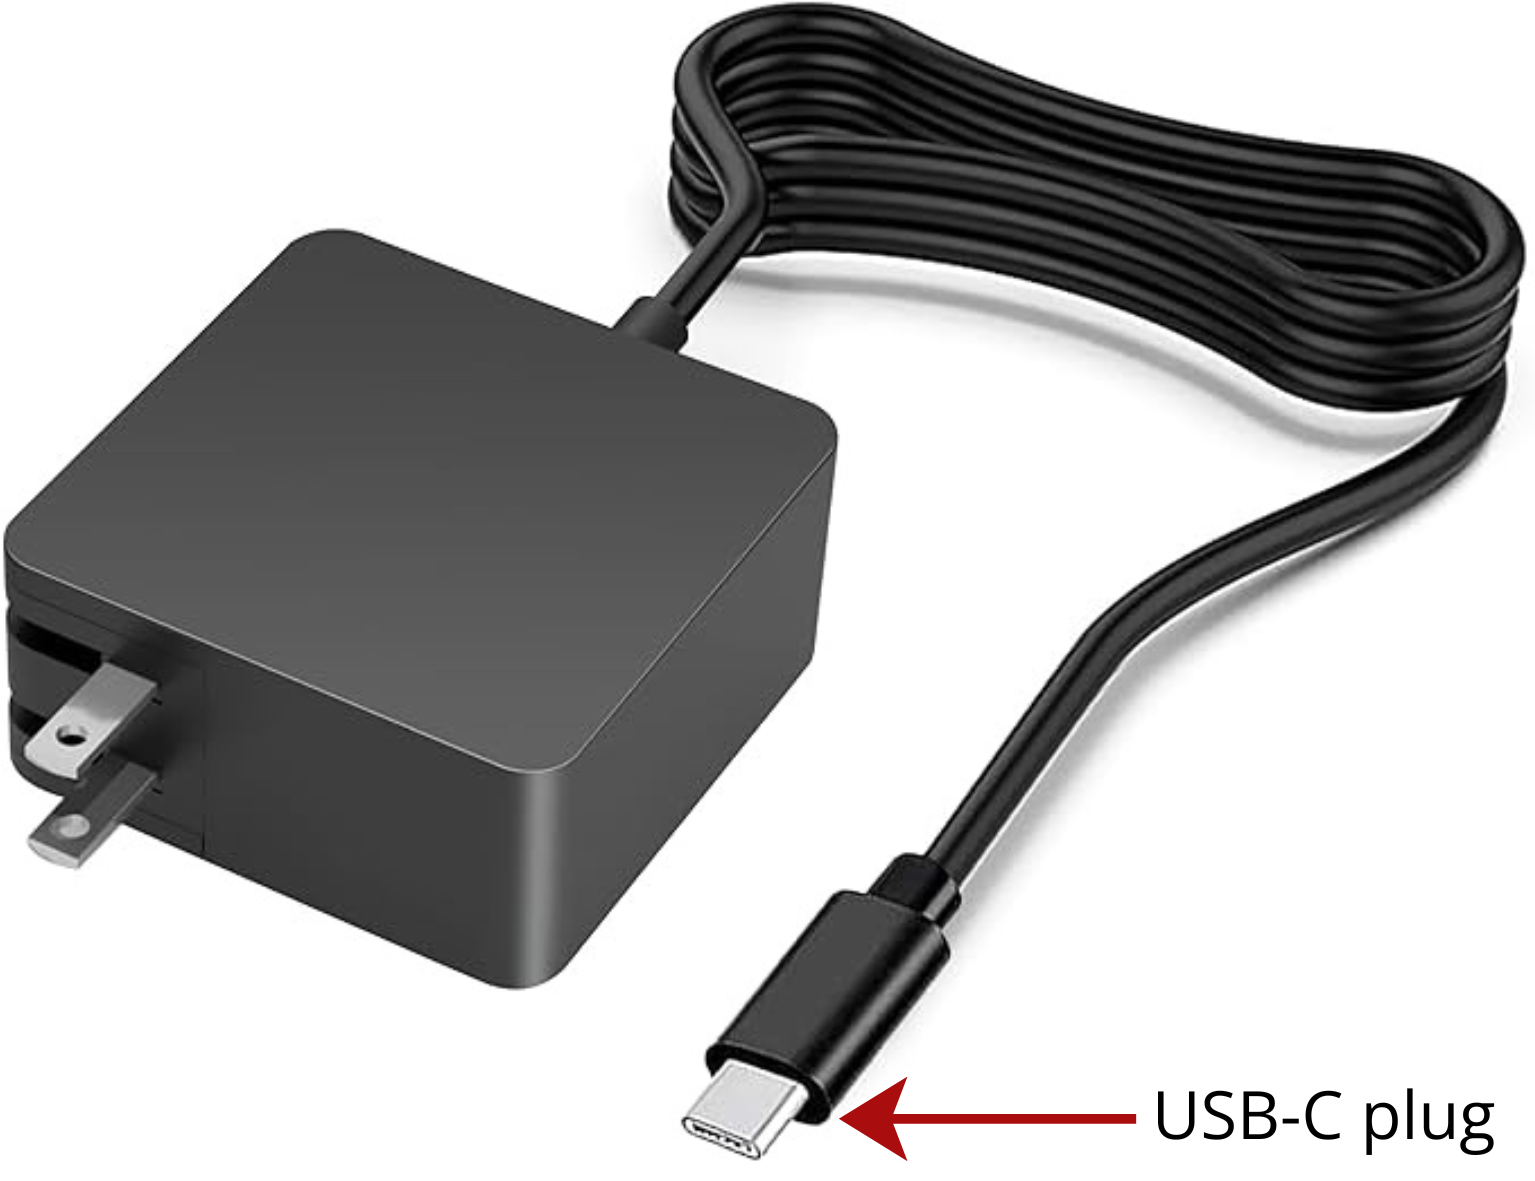
Wall charger with built-in cable and USB-C plug. This option will work with the Envoy Connect 2 that has a USB-C charging port.
All of these chargers can be purchased in most electronics stores and you may already have one that came with another device.
Charging Using USB
A single chime will sound when you connect the player to the charger and the LED light will blink while charging. The LED light will stop blinking when the player is fully charged.
If you can't see the light, you can check the status of the battery by holding down the back button for three seconds when playback is paused. Three beeps indicate the battery is fully charged (over 75%); two beeps indicate a medium charge; and a single beep indicates low battery (under 25%).
The battery will provide between 8 and 10 hours of playback time at full charge.
Charging Using the Rear Solar Panel
Before first charge, make sure to remove the plastic film protecting the solar panel. To charge the player using this method, flip the player onto its back. Then, place the player back side up on a surface such as a table where it will be in direct sunlight. Leave the player in that position in the sun for 8 hours to charge the player.
Low Battery Audio Warning
The player will emit a 'low battery' warning beep when the battery capacity drops below 30%. It is important to charge the player at this point. The player will continue to chime every minute until it turns itself off once the battery level becomes too low. When this happens, the player will still remember your last reading position.
8. Managing Books on the Player
CELA Connect
Books can be loaded onto and deleted from the player using our CELA Connect software, which must be installed onto a computer. Instructions on how to install the software can be found at the following link: https://celalibrary.ca/help/envoy-connect. Alternatively, contact CELA for help.
Anyone with access to a computer can use the CELA Connect software to download books from CELA's website and load them onto the Envoy Connect player. Alternatively, users without computer access can mail their player in to CELA in the provided and already addressed envelope in order to have it reloaded. Please provide your name and Envoy Connect serial number (provided to you at purchase) in the envelope. Further instructions are available by contacting CELA or online at https://celalibrary.ca/help/envoy-connect.
Managing Books through USB Connection
Connect to a computer by inserting the supplied USB plug into the middle port on the bottom edge of the player. For players with a Micro-USB port, ensure that the plug is inserted correctly with the two small 'prongs' on the plug facing down. Don't use excessive force, as it will easily insert the right way around. For USB-C, the plug is reversible and can be inserted in either direction.
You will hear a single melodic chime when it is connected to the computer; likewise for when you disconnect it. This connection is used for loading/deleting books as well as charging the player, as already mentioned.
Note: To load or delete books, the player must be turned off before it is connected to your computer. You can't load and play books at the same time.
Now you can use the CELA Connect software to add or delete books from your Envoy Connect. Instructions on how to use CELA Connect are contained in the CELA Connect User Guide, available by contacting CELA, or for download at the following link: https://celalibrary.ca/help/envoy-connect.
Deleting a book directly from the player
You are also able to delete books directly from the player without the use of CELA Connect. When playback is paused, press the bookshelf button repeatedly until you hear the title of the book you want to delete. Then press and hold the bookshelf and volume up buttons at the same time for five seconds. You will hear five beeps per second over five seconds. Continue to hold down the buttons until you hear a series of five to six rapid beeps in quick succession, which confirms the deletion is complete. It is important to hold the buttons until the rapid beeps are complete; if you release the buttons before then, the book will not be deleted.
Please note that this deletion method also removes the book from your direct-to-player bookshelf with CELA.
9. Additional Features
Resume Last Reading Position
The player will automatically remember where playback stopped, even if the player is turned off or needs recharging. It will resume playback from that position when pressing the play button.
Hearing Player Version and Serial Number
Press and hold both the back and forward buttons at the same time when playback is paused. The following information will be voiced:
- Serial Number (for example, 111000123)
- Player Type Number (for example, Envoy Connect 123456)
- Firmware Version (for example, T16)
This information can be useful in getting technical help from your point of purchase if you are having problems with your player.
10. Advanced: Manual Loading
If you are comfortable with computers, it is possible to manually load books or other audio content onto the Envoy Connect from your computer without using the CELA Connect software.
Before Loading
The following must be in place before adding audio content to the player:
- All audio files for book must be within a single folder on your computer.
- Each book must have its own separate folder. You may have up to 999 different folders (books) and up to 999 audio files in each folder. The audio files are played in the order that they are loaded onto the player—it does not re-order or play them according to the file names. For this reason, ensure the audio files within each folder are pre-sorted in the order you wish to load them. An easy way to do this is to name them numerically and then sort them by name. For example, the first file within a folder could be named 001.mp3, the second file would be 002.mp3, and so on.
- The maximum folder name length is 58 characters, and the maximum file name length is 185 characters. Please ensure your folders and files conform to these requirements. The names of folders and files do not make a difference to how they will play on the Envoy Connect, but if they are too long, they will not transfer correctly.
Transferring Content
There are two ways of transferring files to the Envoy Connect:
- By pasting content directly onto the player through a USB connection
- By placing content onto an external SD card and then inserting it into the player for reading or listening
Each method is discussed in the sections below.
Loading Content to Player Using USB
- Connect the player to your computer using the supplied USB cable.
- Using File Explorer (Windows) or Finder (Mac), open the list of external drives on your computer and open the drive called “Connect (D)”—the letter in brackets may vary depending on what your other computer drives are called. This is the Envoy Connect drive. Once open, the player's contents will be displayed as folders with files within them. If the player has an SD card inserted, this will appear as another drive, and you may add files to it over USB as well.
- In a different File Explorer/Finder window, navigate to the content that you want to load onto the player and, if you're using a screen reader, place your focus on it. Ensure that all related files, such as the chapters of a book, are contained within a single folder, and that every individual book's files are placed in their own folders before continuing.
- Copy the folder(s) of content that you wish to load onto the player by pressing the control and c keys simultaneously on your computer keyboard, or by using your preferred method.
- Navigate back to the Envoy Connect drive on your computer, mentioned above in step 2.
- Paste the copied folders into that drive by pressing the control and v keys on your keyboard, or by using your preferred method.
- Once all content has been transferred, close the Envoy Connect computer drive and remove the USB cable from the computer and the Envoy Connect. You're done!
Loading Content to Player using SD Card
- Insert an SD card (up to 128 GB in size) into your computer using the appropriate SD card reader.
- Using File Explorer (Windows) or Finder (Mac), open the list of external drives on your computer and open the SD card drive and display its contents. Once open, the SD card's contents will be displayed as folders with files within them.
- In a different File Explorer/Finder window, navigate to the content that you want to load onto the player and, if you're using a screen reader, place your focus on it. Ensure that all related files, such as the chapters of a book, are contained within a single folder, and that every individual book's files are placed in their own folders before continuing.
- Copy the folder(s) of content that you wish to load onto the SD card by pressing the control and c keys simultaneously on your computer keyboard, or by using your preferred method.
- Navigate back to the SD card drive on your computer, mentioned above in step 2.
- Paste the copied folders into that drive by pressing the control and v keys on your keyboard, or by using your preferred method.
- Once all content has been transferred, close the SD card drive and remove the SD card from its reader. The SD card can now be inserted into the player (into the bottom-right-hand slot) while the player is turned off. Once the card is inserted, you may resume normal operation of the player. You're done!
11. Audible Indicators
The player will emit various chimes, beeps, or knocks to provide audible confirmation of a button press, player action, or warning. They are as follows:
- Power on and off: a single melodic chime will sound to confirm either of these actions.
- Battery level: three quick beeps indicate a full charge (over 75%), two quick beeps indicate a partial charge, and a single beep indicates a low battery warning (under 25%).
- Volume minimum and maximum: a double beep will sound when either the minimum or maximum volume level is reached.
- Rewinding or fast-forwarding: slow, single beeps will sound during rewind to indicate the passing of 30 second intervals.
- Last section in book: a double beep will sound to indicate the last section has been reached.
- Book deletion: five slow beeps will sound during deletion, and a series of rapid beeps will sound to confirm it.
- No books on the player: a double melodic chime will sound to indicate there are no books on the player. This warning will occur after the player has just turned on as well as when the bookshelf button is pressed while playback is paused.
- Confirmation of all sleep timer settings: a single knock confirms 15 minutes, two knocks confirm 30 minutes, three knocks confirm 60 minutes, and four knocks confirm the feature has been turned off.
- Unable to play book: a single chime will sound to signal this.
- Connecting or disconnecting from a wall charger: a single melodic chime will sound to confirm both these actions.
- Connecting or disconnecting from a computer: a single melodic chime will sound to confirm both these actions.
- Micro SD card insertion or removal: a single melodic chime will sound to confirm both these actions.
12. Frequently Asked Questions (FAQs) and Troubleshooting
Please visit our Envoy Connect and CELA Connect FAQ and Troubleshooting page for frequently asked questions and troubleshooting for common issues.